Thursday, December 20, 2012

2-Layered PCB with a Laser? Nah, Toner Transfer

I tried using the laser to remove some spray paint, and... I declare it a dud. Two major factors stymied this process for me for the moment:
  1. I didn't have the right spray paint (matte black) nor the right environment (dry and warm) for the paint I did have. What I did get to stick to the copper had a very uneven surface.
  2. The laser is... finicky. I can't tell if the layers were wildly inconsistent, if the paint behaved differently as it dried, or if maybe the laser had trouble, not liking the cold temperature or moist environment. I never can tell if it's about to give up.
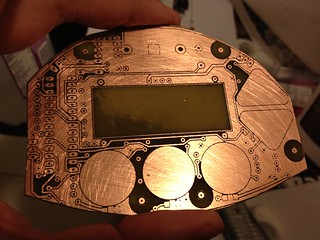
Impatient as usual, I used my regular method: laser printer toner transfer. Determined to make a 2-sided board work, I spent a while aligning corner crop marks and pre-taping the paper with the toner before laminating it to the copper. The toner transfer worked beautifully-- perfect result laminating it ten times (5 up, 5 down), but the top-bottom alignment, while close, may not be close enough. At this point it's etched (see photo) and drilled, but there are still bridges and the misalignment will make assembly an adventure.

Looking at guides online, (especially the tutorial at An Engineer's Life which so many people are linking to today,) it does seem like most people use a photographic process and abandon toner transfer when they go for double-sided and SMD. Before going that route, I want to take toner transfer further though-- I've had such good results so far, the only issue is top-bottom alignment. The biggest sources of alignment error:
  1. Top-bottom alignment of printed out patterns. A light box, some magnets, and tape should do the trick-- I need to see the registration targets better. Update: lightbox on the way from B&H.
  2. The laminator binds and jerks sometimes, which could distort the pattern slightly. It's hard to tell without sending through a test image, but it seems like time to take apart the laminator and see about modding it to separate the rollers a hair.
I'm happy with a slightly lower level of quality with toner transfer because it's a simpler process with fewer (and cheaper) expendables that can also transfer labeling to the top and bottom after etching.

Monday, December 17, 2012

Laser for PCB Prototyping?

I've had a great time working on circuit designs in Eagle the last week or so-- after my surgery, my sciatic pain is mostly gone and I'm able to concentrate again! Still, I'm mostly confined to the neighborhood and can't lift or bend or exert myself for another few weeks, so I'm happily plugging away at a few projects, the main one of which is my latest coffee grinder timer.

The timer PCB's odd shape was dictated by the enclosure's design, resulting in a 100mm x 74mm board. It needed to be double-sided, but traces were made wide and vias were kept to a minimum in the interest of home prototyping. I've had great success with toner transfer in the past, but not for 2-sided boards, and not for anything large.

A PCB-production process I've wondered about is using a laser engraver to remove an etch-resistant layer on copper before normal etching. The best and most successful example I've found is on Instructables: "Custom PCB Prototyping using a Laser Cutter," where the author uses flat black Krylon indoor/outdoor paint as the resist.

The example (at right) shows a single-sided board, but I'm primarily interested in using the process for excellent top-bottom registration. Before attempting the large board, I will first try some small pieces with test shapes, then I'll try a double-sided ATmega32u4 breakout board (my own design), then Grinder Timer 5. Stay tuned...

Sunday, December 16, 2012

74 Pink LED's: What To Do?

Dear reader, I need a spark of an idea!

Years ago, deep in the throes of a solder fume jag, I bought TWO "1-31-07 Memorial" kits from Evil Mad Scientist Laboratories: one Ignignokt, one Err (seen below, on the moon). Wikipedia: "2007 Boston bomb scare" article linked here for posterity.

The Mooninite kits are the same except for the different bags of LED's, and while I soldered up Ingingot in no time (at right), Err's kit became a parts donor. In shuffling through some old parts, I just found its big bag of BIG 10mm pink LED's-- says 68 but I counted 74. So big! So PINK!!! They scream for a project of their own.  Free association... LED's make flashy things... flashy things for Burning Man... boogie at Pink Mammoth.... er, do they need a sign?

What would you do with 74 BIG PINK LED's?!